What is KaniManabu?
KaniManabu is a WaniKani-style SRS app for macOS that allows users to memorize words by typing instead of viewing the card and picking a difficulty. KaniManabu has built in card types, which makes it easy for users to create their own decks without messing with templates.
Things to look out before using KaniManabu
Enable Japanese Input Method
For review, KaniManabu doesn’t require Japanese IME to be enabled since the app has a built in one. However, adding/modifying cards requires the Japanese Input Method to be enabled to enter Hiragana or Katakana for readings when prompted.
You can enable the Japanese IME in macOS by following these steps.
- Open System Preferences
- Click on Keyboard
- Clickl the Input Sources tab in Keyboard Preferences
- Click the + button to add a new input method.
- Type Japanese in the search field and select “Japanese – Romaji”. Then click the Add button.
- Enable Katakana and Romaji input modes.
To switch between Hiragana and Romaji mode, press CONTROL + Shift + ; for Romaji and CONTROL + Shift + J for Hiragana. For Japanese (JIS) keyboard layout, press かな for Hiragana and 英数 (えいすう, lit. letters and numbers) for Romaji. Make sure you choose the hiragana or katakana when using IME. Kanji words will not be accepted as the answer for readings. However, it will not mark the answer wrong, just warn the user. Katakana answers are converted to hiragana when checked.
Install Japanese TTS Voices
With the “Automatically play audio after answer” option enabled in preferences, your Mac will say the Japanese word after you answered it correctly, except for Kanji. KaniManabu relies on the built in Text to Speech in macOS to provide this feature. You need to have the Japanese Text to Speech voices installed for this to work properly.
You can install the Japanese TTS voices by doing the following:
- Open System Preferences.
- Click on Accessibility
- From the sidebar, choose Spoken Content for macOS 11 Big Sur or later or Speech in macOS 10.15 Catalina.
- From the voice dropdown, click on it and choose the “Customize” option.
- In the search field, type Japanese. Enable Kyoko and Otoya and click Ok
- The voices should now download and KaniManabu should now say the Japanese words properly.
If you are using the Microsoft Voice, you do not need to follow these steps, but you need to add an API key.
Using the App
Main Interface
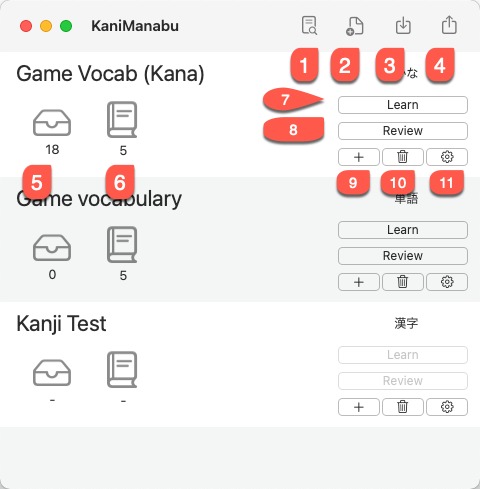
- Deck Browser – The Deck Browser allows you to browse cards from decks you have, by SRS level, and view call cards and critical items. You can manage cards in the Deck Browser.
- New Deck – Creates a new deck.
- Import Deck – This option allows you to import decks from a CSV file, see Importing Decks.
- Export Deck – This option allows you to export a deck to a CSV file.
- Review Queue – This indicates the number of cards that are in the review for a specific deck.
- Learning Queue – This indicates the number of cards that are in the learning queue for a specific deck.
- Learn – Starts a learning session for the deck you choose.
- Review – Starts a review of cards in the review queue for the deck you choose.
- Add Card – Adds a new card to the deck
- Delete Deck – Deletes the deck
- Deck Options – This allows you to rename the deck or set options.
Deck Browser
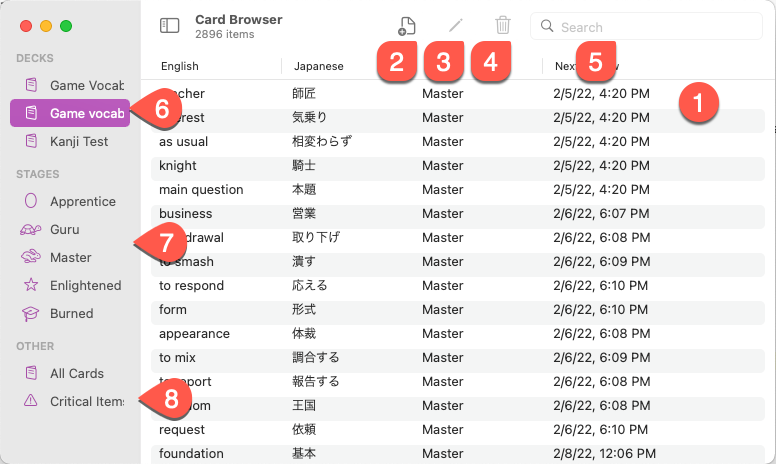
- Cards – Your cards in the deck/SRS Level/Critical Items will appear here.
- Add Card – Adds a new card to the current deck (Does not apply to viewing cards by SRS Stage, All Cards, and Critical Items)
- Modify Card – Modifies the current card
- Delete Card – Deletes the current card
- Filter/Search Field – This is the search field for the current deck. You can filter by English, Japanese, Kana readings, notes, and tags.
- Decks – Your decks appear here
- SRS Stages – View cards by SRS stage
- Critical Items – These are cards that you answered correctly less than 70% of the time.
Right clicking a card also allows you to modify, delete, suspend, and reset a card.
Learning Mode
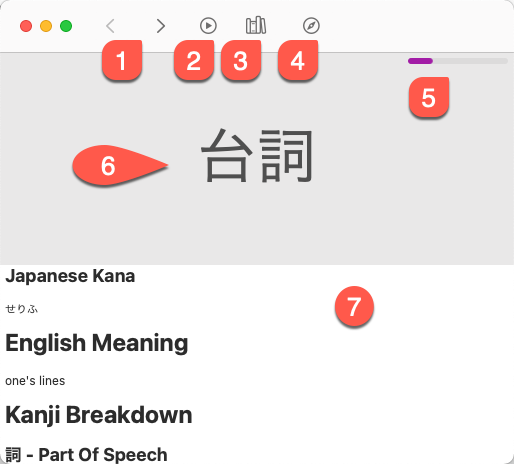
In learning mode, you get to preview the cards before taking a quiz on them. Once you finish the quiz, the newly learned cards goes into the review queue.
- Go Back/Advances – You can advance or view the previous card in the learning queue. Once you reach the end of the queue, you can start the review quiz.
- Play Voice – Plays the TTS voice of the Japanese Word (doesn’t apply to Kanji)
- Look Up in Dictionary App – Looks up the current word in macOS’s Dictionary App.
- Additional Resources – Allows you to view additional resources
- Japanese Word/Kanji – The word or Kanji you are learning
- Informations – this contains all the information for the current card
Review Mode (Default)

This is the review interface where you review items that are in the queue.
- Last 10 Items – Views the list of 10 items you have reviewed in the current session
- Item Information – Views the card’s information. This button will enable after you answered.
- Review Status – Shows current score, number of cards correct, and number of remaining cards in the queue.
- Japanese Word/Kanji – This is the Japanese Word/Kanji you answering the question for
- Question Type – This is what answer the card is prompting you.
- Answer Fields – You type your answer what the card asked for here. If you enter invalid characters or an answer that is correct, but not what the card is asking, it will prompt you.
- Check Answer – Check your answer by pressing the enter button or this button.
Note: Once you answered all the questions for a card, it will show the next SRS level.
Review Mode (Anki Mode)
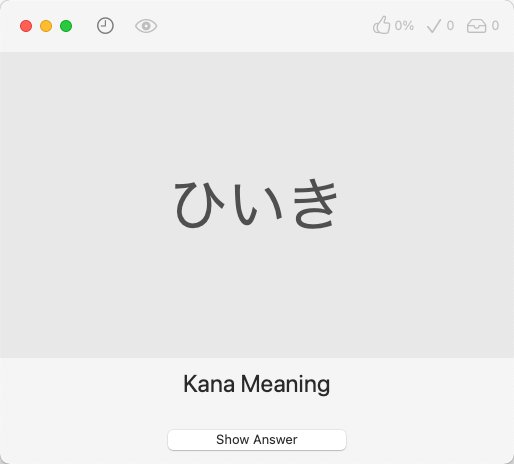
In Anki Mode, you guess the answer on paper or in your mind and click the Show Answer button.
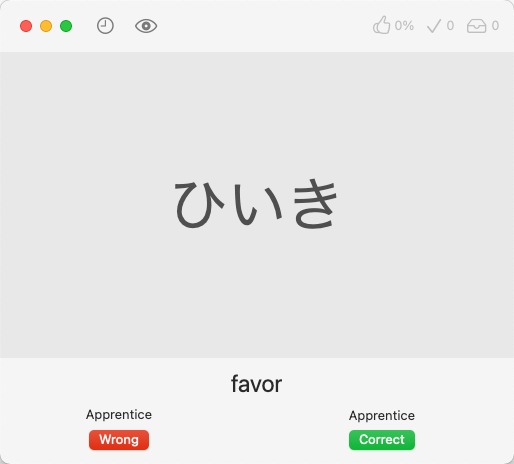
After clicking the Show Answer, you select if you got the card Correct or Wrong. The next SRS level will appear above the Correct and Wrong buttons.
Preferences
General
- Automatically play audio after answer – For Kana and Vocabulary decks only, you can have the TTS (Text to Speech) play back the word after you answered the reading correctly.
- TTS Voice: This allows you to select what voice to use. There are three voices you can choose form. Kyoko and Otoya are voices that are built into macOS and doesn’t require an internet connection to use (see Install Japanese TTS Voices to learn how to enable the voices). The Nanami Microsoft Speech voice and Emi IBM Watson uses the Microsoft Azure Cognitive Speech Service and IBM Cloud respectively, which gives a more accurate pronunciation of the word. However, it requires an internet connection to use initially with a slight delay. However, the voice sample will be reused in future reviews once generated and other words that use the same kana reading. Subscribers do not have to do anything to make these voices work. For free users, additional setup is needed in order to make them work. Otherwise, it will fall back to the macOS TTS.
- New Card Limit – The global limit for learning new cards for each deck. This can be overridden in the deck settings
- Remove Orphaned Cards – This button removes any cards that are not associated with a deck. This is useful if the card for an associated deck wasn’t deleted when the user deleted a deck.
- Use KaniManabu’s IME for Readings – When enabled, alphanumeric letters are automatically inputed as hiragana/katakana. Note that to input a sokuon (little tsu), type the same letter twice. To input an ん, type “n” twice. This option is enabled by default.
Privacy
- Send Crash Data and Statistics – This helps us find bugs and fix them before users report them. Of course, the data does not personally identify the user and won’t be used for any marketing purposes or identifing the user.
Subscriptions
On the Mac App Store version in Preferences, you can purchase a subscription to support the development of our apps and access additional features. This gives you access to premium TTS voices (Microsoft Azure Speech and IBM Watson) without configuration (your subscription fee covers the costs hosting this service), remove deck limitations, and unlock additional features planned. Subscriptions are available for family sharing.
Once you obtain a subscription on your one of your devices, it will be available automatically on other devices as it saves the Sub ID, a UUID on your personal iCloud account. If this UUID is missing, you can use the Restore Subscription button to restore it.
To change your subscription, use the App Store.
Advanced
Setting up Microsoft TTS (Advanced Users Only)
With Microsoft TTS, you can get more accurate pronunciation of Japanese words. Subscribers and patrons do not need to follow these steps and the voice will work out of the box. Simply select the voice from the list.
Specifying the Microsoft API Key is not available on the iOS/iPadOS version of KaniManabu.
You need an API key to use Microsoft TTS. There is a 500k character limit per month, but for most, if not all users won’t reach this limit. The following steps is for Advanced users only.
- Create an account on https://portal.azure.com
- Create a Subscription which will have your billing information
- Create a Resource Group in East US
- Create a Speech Service entry. Use the Free P0 plan.
- In your Speech Service entry, your API key can be found under Resource Management -> Keys and Endpoint
- In Preferences, copy the API key and paste it in the MS Azure TTS API key field and click save and select the Microsoft TTS voice. Microsoft TTS should now work in your learning and review sessions.
All audio files are stored in a Core Data container, AudioContainer.sqlite, AudioContainer.sqlite-shm, and AudioContainer.sqlite-wal in the KaniManabu’s Application Support folder (~/Library/Application Support/KaniManabu for the non-App Store version and ~/Library/Containers/KaniManabu/Data/Library/Application Support/KaniManabu for the App Store version). You can copy this file to another Mac so you don’t need to have the app generate the audio again.
Setting up IBM Watson TTS (Advanced Users Only)
With IBM Watson TTS, you can get more accurate pronunciation of Japanese words. Subscribers and patrons do not need to follow these steps and the voice will work out of the box. Simply select the voice from the list.
Specifying the IBM Watson API Key is not available on the iOS/iPadOS version of KaniManabu.
You need an API key and Instance URL to use IBM Watson TTS. There is a 10k character limit per month in the free tier, but for most, if not all users won’t reach this limit. The following steps is for Advanced users only.
- Create an account on https://www.ibm.com/cloud/watson-text-to-speech by clicking Start for Free button
- Select a plan and create an account. Follow instructions in creating the resource after creating the account.
- Log onto the IBM Cloud Dashboard: https://cloud.ibm.com
- Click Services and software under Resource Summary
- Under Services and software, click the Text to Speech resource.
- Copy the API key and paste it in the IBM TTS API Key field and copy the URL and paste it in the IBM TTS Instance URL. Click Save
All audio files are stored in a Core Data container, AudioContainer.sqlite, AudioContainer.sqlite-shm, and AudioContainer.sqlite-wal in the KaniManabu’s Application Support folder (~/Library/Application Support/KaniManabu for the non-App Store version and ~/Library/Containers/KaniManabu/Data/Library/Application Support/KaniManabu for the App Store version). You can copy this file to another Mac so you don’t need to have the app generate the audio again.